Can't Play Valorant? How to Fix VAN-9001 & Secure Boot Errors

By GPU Sniper Team | pctechsniper.com
Last Updated: July 2025 | Questions? Contact Us
Quick Summary
If you've been hit with errors like VAN-9001, VAN-9003, or similar messages in Valorant, you're not alone. Riot Games has updated its Vanguard anti-cheat system to require Secure Boot and TPM 2.0 to be active on your system. This guide will walk you through why these changes were made and, more importantly, how to enable these settings in your PC's BIOS so you can get back to clutching rounds.
Why Does Vanguard Need Secure Boot & TPM 2.0?
The short answer is: to make cheating much, much harder. Riot Vanguard, Valorant's aggressive anti-cheat software, operates at a very deep level of your operating system (the kernel) to detect foul play. However, sophisticated cheats can also use low-level exploits, like malicious or modified drivers, to load before Vanguard even starts. This allows them to hide from detection effectively.
- Secure Boot: This is a security standard developed for the UEFI (the modern replacement for BIOS). When enabled, it ensures that your PC only boots using software and drivers that are trusted by the manufacturer. It creates a "chain of trust," preventing unauthorized code—like a rootkit used for cheating—from loading during startup.
- TPM 2.0 (Trusted Platform Module): This is a dedicated microchip on your motherboard that provides hardware-based security functions. It securely stores cryptographic keys and attests to the integrity of your system's boot process. For Vanguard, the TPM helps verify that the system hasn't been tampered with and that Secure Boot is genuinely active.
By enforcing these two features, Riot Games raises the bar for cheat developers significantly, creating a more secure and fair environment for everyone.
Step 1: Check if Secure Boot and TPM are Enabled
Before diving into your BIOS, let's quickly check your system's current status. It only takes a few seconds.
- Press
Windows Key + Rto open the Run dialog. - Type
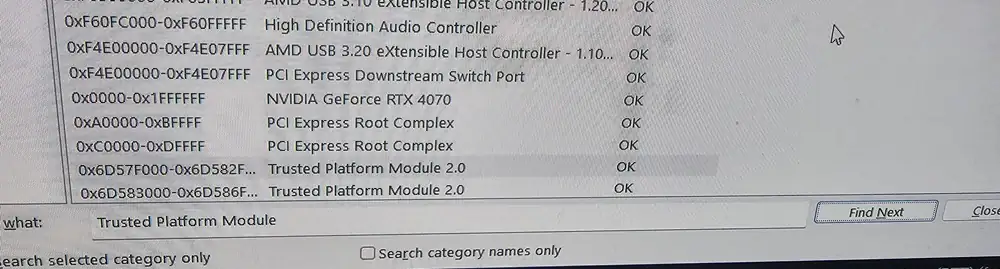
msinfo32and press Enter. This will open the System Information window. - In the System Summary view, you can either scroll to find the lines or use the "Find what" box at the bottom. Search for
Secure Boot Stateand thenTPMto check their status quickly.
If Secure Boot State is "On" and you can confirm TPM 2.0 is present and enabled, you shouldn't be getting these errors. If either is "Off," "Unsupported," or "Not Found," you'll need to proceed to your BIOS.
Step 2: How to Enable Secure Boot & TPM in BIOS/UEFI
Enabling these settings requires entering your PC's BIOS/UEFI menu. The exact steps vary by motherboard manufacturer, but the general process is the same.
How to Enter BIOS/UEFI:
Restart your computer and press the designated key repeatedly as it boots up. Common keys are Delete, F2, F10, or F12. The correct key is usually displayed on the splash screen when your PC first starts.
For ASUS Motherboards:
- TPM: Go to Advanced > AMD fTPM configuration (for AMD CPUs) or PCH-FW Configuration (for Intel CPUs) and enable TPM Device Selection.
- Secure Boot: Go to the Boot tab > Secure Boot. Set Secure Boot Mode to Standard or Windows UEFI mode. Ensure CSM (Compatibility Support Module) is disabled under the Boot tab, as it conflicts with Secure Boot.
For MSI Motherboards:
- TPM: Go to Settings > Security > Trusted Computing. Enable Security Device Support. The AMD fTPM switch or Intel Platform Trust Technology (PTT) should then become available to enable.
- Secure Boot: Go to Settings > Advanced > Windows OS Configuration. Set Secure Boot to Enabled.
For GIGABYTE/AORUS Motherboards:
- TPM: Go to Settings > Miscellaneous. Enable AMD CPU fTPM (for AMD) or Intel Platform Trust Technology (PTT) (for Intel).
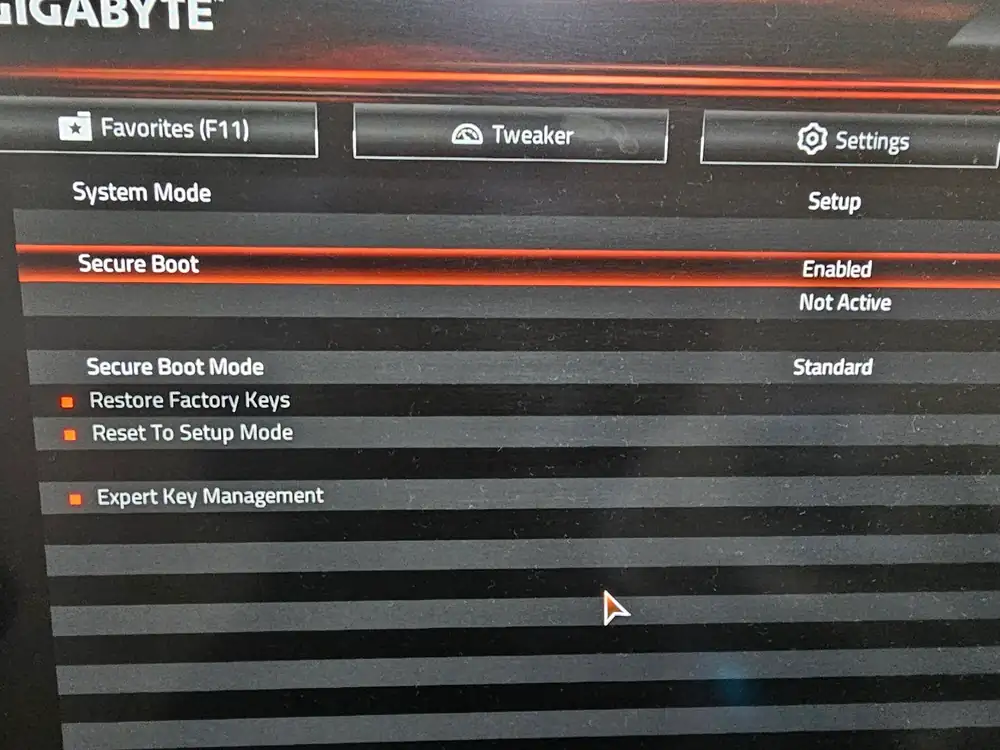
- Secure Boot: Go to the Boot tab. Make sure CSM Support is Disabled. Then find the Secure Boot option on the same page and set it to Enabled.
Remember to save your changes and exit the BIOS. Your PC will restart, and hopefully, Valorant will now launch without errors!
Common Pitfalls & Solutions
Pitfall 1: Secure Boot is Enabled, but Keys are Invalid
Sometimes, Secure Boot can be enabled, but it won't be truly "active" because the required cryptographic keys are not loaded. This is common on custom-built PCs or if you've recently cleared your CMOS.
The Solution: Restore Factory Keys
Deep within the Secure Boot menu in your BIOS, you should find an option like Key Management, Install default Secure Boot keys, or Restore Factory Keys. Select this option to load the default keys that came with your motherboard. After doing this and saving, Secure Boot should become fully active.
Pitfall 2: CSM is Enabled
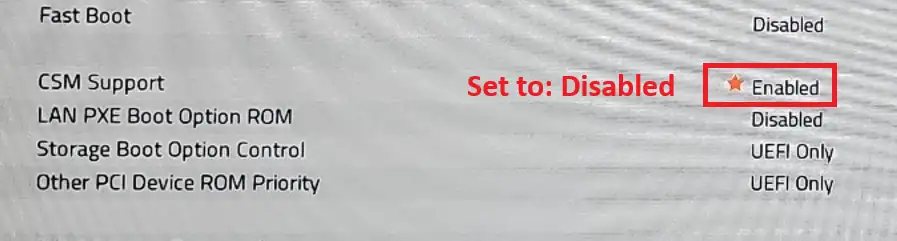
CSM, or Compatibility Support Module, is a feature that allows newer UEFI systems to boot older, legacy hardware and operating systems. Secure Boot cannot function when CSM is enabled. If you see a CSM option in your BIOS, you must disable it before you can properly enable Secure Boot.
Still Having Trouble?
BIOS settings can be tricky, and every motherboard is a little different. If this guide didn't solve your issue, or if you have tips for other motherboard brands, feel free to reach out. Your feedback helps us keep our guides up-to-date for the entire community.
Contact Support